NETWORK CHAT PROGRAM
In this lesson we will be constructing a chatroom program that can interface with a server. In this case the server is already set up and we will be using an API to connect to it. You can download the API from my PLTW page.
IMPORTANT! - Make sure you setup the API in the project properties!
The Window
- We need to create a basic window for a chat program. You already know all of the required knowledge to build a JFrame with a JTextArea, a JTextField, and a JButton.
NEW THING: Although its optional, I would recommend using a
JScrollPane. A JScrollPane allows the user to scroll the chat and see older messages. Else they will be hidden over time.- A JScrollPane is finicky in it's construction. In WindowBuilder, in order to attach a JTextArea to a JScroll pane, setup your components in this order:

- NOTE: There is a panel in between the JScrollPane and the JTextArea. Make sure to set that JPanel to a
FlowLayout
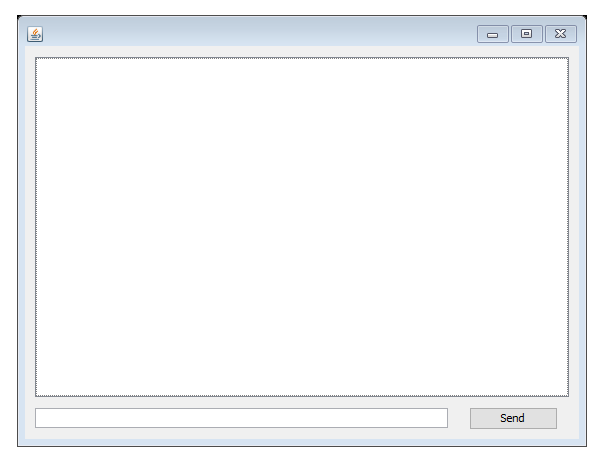
Using WindowBuilder, Try to recreate this layout for your chatroom:
Applying the API
- Under our
mainfunction, we need to add some information for the API to use. Add the following:
String ip = "10.1.15.254";
short port = 31415;
Now we need to create our client class. The client class is an extension of the API and is needed for the server to recognize you as a user to send and receive data. Our client also allows us to control what happens to the data coming in from the server.
i. Create a new class called
UserClientthat extends Client.ii. Make sure to import the correct Client from
org.duckdns.crackedcrafters.zaneoblaneo.clientServerAPI.Clientiii. We also need to give the user class an instance of our chat window. In my case the window class is called SimpleChat. (Yours may be different!) Add an argument to your constructor asking for a chat window. Set the local variable to that window.
public class UserClient extends Client{

    private SimpleChat chat = null;

    public TestClient(Socket s, SimpleChat chat) throws IOException, NoSuchMethodException, SecurityException {
        super(s);
        this.chat = chat;
    }

    @Override
    public void onClientRecievedData(Object data) {

    }

    @Override
    public void onClientSentData(Object data) {

    }

}
We now need to create a new instance of this UserClient class in our
mainmethod. Remember this takes in the argument of the window.i. NOTE: the value:
thisreturns the current class. If your main method is inside your window class, addthisas the argument.ii. Then we need to call the start method under client;
client = new UserClient(new Socket(ip, port), this)
client.start();
Adding Logic
- We now need to add our logic to communicate with our window. Add an action listener to send the data entered in the JTextField to the server.
- You can replace
usernamewith whatever name you choose.
send.addActionListener(new ActionListener() {

    @Override
    public void actionPerformed(ActionEvent e) {
        try {
            client.send("[" + username + "] " +  input.getText());
            input.setText("");
        } catch (IOException e1) {
            e1.printStackTrace();
        }
    }

});
- Now lets make a new method in our window class to make the next step easier. Create a method called
writeto append to the JTextArea.
public void write(String data) {
    textArea.append(data);
}
- Now under our client class, we need to ask it to receive data and send it to our JTextArea. Add the following under the
UserClientclass:
@Override
public void onClientRecievedData(Object data) {
    chat.write((String)data + "\n");
}
Now you should be good to go! Test your program :D